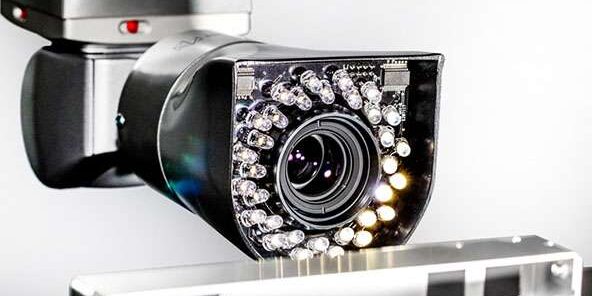
The HP-C is a vision camera measurement system designed for coordinate measuring machines (CMMs). It is especially useful for applications where capturing images is faster than traditional probing methods. This system can effectively measure small features, sensitive components, or easily deformed parts. It includes an integrated lighting system and a high-resolution camera.
With a working distance of 110 mm and two magnification settings, the HP-C is a highly versatile tool, particularly suited for measuring features that are too small for tactile probing. Users can select one or more features—such as hole sizes or edge positions—for measurement from the full field of view (FOV) or specific regions of interest (ROI) within the FOV. The software allows the user to optimize the image for each measurement by controlling the illumination.
Features & Benefits
Get to the Details
The HP-C uses multi-capture technology to gather various measurement features quickly. This allows for rapid data collection, which can then be zoomed in on for a more detailed examination of each individual characteristic.
Capture the Bigger Picture
Using the HP-C in conjunction with PC-DMIS significantly enhances the sensor’s throughput, allowing for the quick acquisition and measurement of additional characteristics beyond its immediate field of view.
Maintain Measurement Precision
The HP-C features higher resolution zoom capabilities that produce precise measurement results. It also illuminates the work area to ensure the camera captures all relevant data.
Customizable Pixel Sizes and Fields of View
With the HP-C, operators can choose a smaller measurement area for increased accuracy or select larger fields of view for measuring more extensive or larger features.
Technical Data
| HP-C-TS5.10 | Mode 1 – Large FOV | Mode 2 – Accurate |
| Product no. | GB0200-0001 | |
| Field of view | 11,7 mm x 8,7 mm | 5.9 mm x 4,4 mm |
| Pixel size | 11,4 µm | 5,7 µm |
| Frame rate (frames per second) | 15 | 19 |
| Probing error of the image probe PFV2D* | 5,0 µm | |
| Probing error PF2D* | 8,0 µm | |
| XY Unidirectional length measurement error EUXY* | 4,2 µm + L/333 | |
| Image probe unidirectional length error EUV* | 3,0 µm + 1.8L | |
| Camera | 3 Mega Pixel highspeed USB 2 digital colour camera | |
| Optics | f2.8 – f16 50,2mm with standard M39 X 1/26th mounting | |
| Working distance | 110 mm | |
| Illumination | Oblique and targeted at the optical plane center 64 white LEDs split into 16 sectors and 2 rings |
|
| Mounting | TKJ Hexagon Kinematic Joint (Fully auto changeable with HR-R rack) | |
| Communication protocol | USB over Ethernet | |
*ISO 10360-7: 2011 “Imaging probing system”
