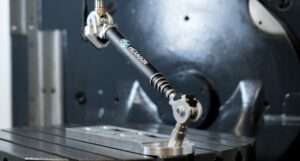
When calibrating small and medium 3- to 5-axis machining machines, the ETALON X-AX LASERBAR simplifies the process by eliminating the need for multiple devices. It offers a single, semi-automated method that quickly delivers results at the push of a button. This solution is compact, lightweight, and reasonably priced, utilizing innovative measurement technologies to assess volumetric machine variances.
Calculating the deviation values of the linear and rotational axes can traditionally take days when using standard measuring tools to record the complete geometric deviation of a 5-axis machine.The X-AX LASERBAR can efficiently record all the geometrical deviations of a 5-axis machine in just a few hours.
This system utilizes interferometric data to evaluate the machine tool’s geometric condition. It employs a multi-stage telescopic tube to guide the laser throughout the operating area. Each end of the tube is supported by precision spheres held in magnetic nests. This technology allows for the calibration of smaller and medium-sized machine tools with three, four, five, or more axes.
The measurement system examines the entire working area of the machine tool in conjunction with the advanced TRAC-CAL software.
The machine coordinate system includes documentation of axis orientation, axial and radial movements, wobbling of the rotary axes, and variations in angular position. With the push of a button, the device generates a measurement report for documentation purposes.
Correction data for the control system can be automatically produced to enhance the accuracy of the machine tool. This process minimizes geometrical errors and results in a consistent production flow, reducing the number of rejected parts or those needing rework.
Features & Benefits
Quick and Autonomous Machine Monitoring
Monitoring, verifying, and documenting various equipment can be accomplished with just a few simple steps.
Identifying Relevant Axis Geometry for Quality
For linear axes up to 1.5 meters in length, the following factors are considered: pitch, yaw, roll, placement (6 DOF), squareness, and straightness in both directions. For rotational axes, the relevant criteria include wobbling, angular placement (6 DOF), as well as axial and radial runout, and orientation.
Volumetric compensation is optional, but it can significantly enhance accuracy.
If a machine’s geometry is out of tolerance, compensation data can be exported in a single step and transferred to the appropriate machine control to ensure the highest levels of precision.
Verification measures
Verification measures that meet standards include ISO 230-2, ISO 230-6, or VDI 3441. Alternatively, the ISO 230-4 (ballbar test) can be utilized. Identifying Relevant Axis Geometry for Quality
Technical data
| DETAILS | |
| Uncertainty | U(95%) = 1.0 µm |
| Measurement range | 270 mm – 1050 mm / 210 – 745 mm |
| Horizontal angular range | no fix limit |
| Vertical angular range | -45° to +75° |
| Weight | 0.4 kg (without sensor box) |
